 English
 Deutsch
 Dansk
Dansk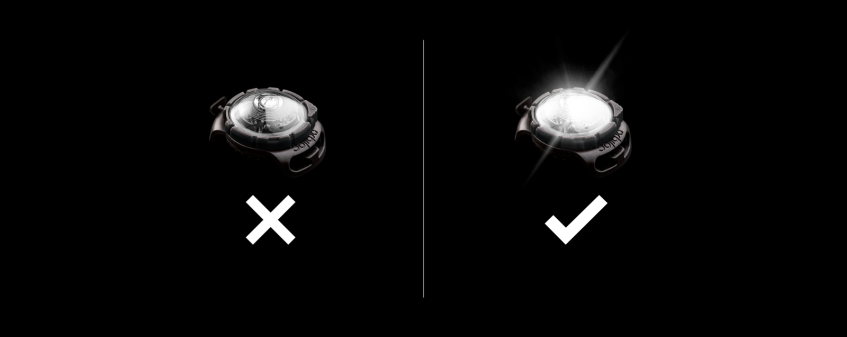
Did your Orbiloc Safety Light stop working, or does it no longer work reliably? Here you find out how to solve the problem to be visible again soon.
Note: Errors that can be fixed following points 1–5 on the list below are not viewed as valid grounds for claims. A broken Mode Selector Ring (point 6) may on the other hand – in accordance with the statutory warranty – entitle you to a new Mode Selector Ring.
WHY YOUR ORBILOC SAFETY LIGHT NO LONGER WORKS (RELIABLY)
The reason why an Orbiloc light may stop working (reliably) is usually a loose connection between the battery pack and the electronics. This loose connection can have several causes, which you can quickly resolve.
In rare cases, the fault in your light can be due to a broken Mode Selector Ring, which then needs replacement.
The following list will help you find and solve the problem so that you are soon visible again.
1. THE LIGHT IS NOT RETIGHTENED (PROPERLY)
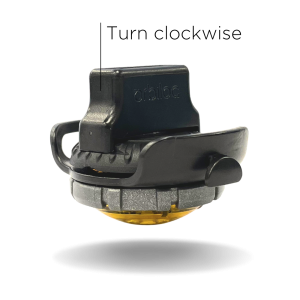
Solution: Retighten the light using the Service Tool or by hand.
Explanation: We do not tighten the Orbiloc light completely during production so that it does not use up battery capacity while being in the sales pack.
Therefore you must retighten your light before the first use, as described in the Quick Guide (p. 8). Otherwise, a loose connection may occur.
For the same reason, you must tighten the light properly after changing the battery, mount etc.
2. YOU USE THIRD-PARTY CR2032 BATTERIES
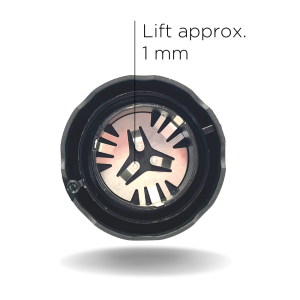
Solution: Bend up the three battery springs in the base of the light by approx. 1 mm.
Explanation: Generally, it is no problem using third-party CR2032 batteries, but it does require you to bend the three battery springs in the bottom of the base up about 1 mm. Otherwise, the connection between the batteries and the electronics is insufficient.
Orbiloc’s battery pack is thicker than two single CR2032 batteries. By carefully bending up the battery springs, you compensate for the difference and establish contact with the electronics.
Note: The specified visibility and battery life of the Orbiloc Safety Light can only be guaranteed when using the Orbiloc battery pack. When using batteries from third-party suppliers, these values can vary, depending on the quality of the batteries.
3. YOU PUT AN O-RING IN THE BASE OF THE LIGHT
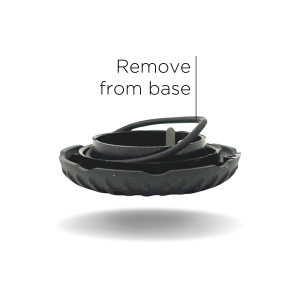 Solution: Remove the O-ring from the base and place it in the designated groove above the thread of the lens.
Explanation: If you put the O-ring (the rubber seal) into the base of the light (see picture), you will not be able to screw the light together correctly.
Remove the O-ring from the base to solve the problem and establish proper contact between the battery pack and the electronics. The O-ring correctly belongs in the designated groove between the installed mount and the thread of the lens (see picture below.)

Tip: It can be hard to see the O-ring in the base because they are both black. If you have a base of another light near you, you can use this for a test. If your light works with the other base, the problem with the original one is almost guaranteed to be a misplaced O-ring.
4. THE BATTERY PACK IS INSERTED INCORRECTLY OR EMPTY
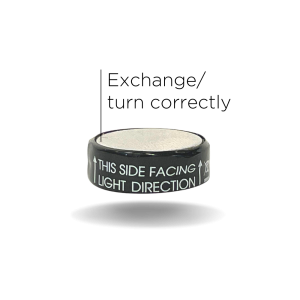
Solution: Turn the battery pack around or replace it.
Explanation: If the battery pack is inserted incorrectly or is empty, it must be replaced or turned around. Place the battery pack with the positive pole (+) pointing downwards in the base. (When using two CR2032 batteries, both positive poles (+) must face down.)
Orbiloc’s battery packs have an expiration date so that you can check if the battery pack is still usable. On rare occasions, we have seen battery packs already expired when sold. Please contact the retailer if this is the case.
Important: The expiry date should not be confused with the battery life. A battery can be empty/used up even though it is not expired.
5. THE LIGHT IS ASSEMBLED INCORRECTLY
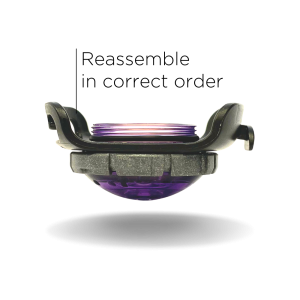
Solution: Disassemble the light and reassemble it. On page 13 of the User Manual, you will find a guide (Change Mode Selector Ring) showing all the steps. (However, note that you do not have to replace the Mode Selector Ring as is explained in the guide.)
Explanation: If the light is assembled incorrectly, you cannot tighten it sufficiently. To solve the problem, it helps to disassemble and reassemble the light.
When reassembling your light, note that
– the magnet of the Mode Selector Ring needs to be placed in one of the four semicircular bulges.
– the O-ring needs to be removed before installing the mount (and then placed back in its groove again).
– the mount needs to be placed with its bulges along the guide pins of the lens.
6. THE MODE SELECTOR RING IS BROKEN
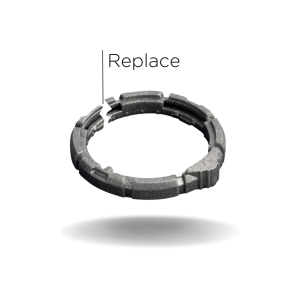
Solution: Replace the Mode Selector Ring. On page 13 of the User Manual, you will find a guide showing all the steps.
Explanation: If the Mode Selector Ring is broken, you can no longer switch on the light. Therefore, you need to replace the Mode Selector Ring.
The Mode Selector Ring can be faulty in the following ways:
– The Mode Selector Ring is broken into pieces.
– The magnet contained in the Mode Selector Ring got lost.
– The magnet in the Mode Selector Ring is eroded (rusty)*.
*An alloy protects the magnet from rust. However, the alloy can be damaged by salt crystals, for example. We, therefore, recommend rinsing the Orbiloc Safety Light after each use in salt water, mud etc.
IF THE PROBLEM PERSISTS
The list above covers both common and rare problems that can cause your light to stop working (reliably).
If you cannot solve the problem with the help of the list, we recommend that you contact the dealer or our customer service (info @ orbiloc.com). Please mention that you have worked through the list without success.
Share this: ![]()
![]()
![]()
![]() #orbiloc #orbilocsafetylight
#orbiloc #orbilocsafetylight